Tuesday, May 25, 2010
Apache PhotArk M2-incubating released
Apache PhotArk will be a complete open source photo gallery application including a content repository for the images, a display piece, an access control layer, and upload capabilities. The idea is to have a rigid design for the content repository with a very flexible display piece. The images in the content repository will be protected with granular access control.
PhotArk gallery currently allows you define and manage a set of albums hosted local into the content repository and provides a default web UI for album navigation. PhotArk also supports creating and deploying your own photo gallery into Google AppEngine cloud infrastructure.
For full details about the release and to download the distributions please go to:
http://incubator.apache.org/photark/photark-downloads.html
Apache PhotArk welcomes your help. Any contribution, including code, testing, contributions to the documentation, or bug reporting is always appreciated. For more information on how to get involved in
Apache PhotArk visit the website at:
http://incubator.apache.org/photark/
Thank you for your interest in Apache PhotArk!
The Apache PhotArk Team.
Sunday, May 16, 2010
Linux/Unix chmod (chmod xxx file)
Here I'm giving a brief explanation on how to changes the permission of a file in Linux/Unix system.
Syntax;
chmod [numeric number] [file]
here [numeric number] is created using the following criteria.
| owner (User who owns the file.) | group (Group that owns the file.) | anybody (Other) | |
| non | 0 | 0 | 0 |
| read | 4 | 4 | 4 |
| write | 2 | 2 | 2 |
| execute | 1 | 1 | 1 |
so its easy.
if you want only read by owner;
chmod 400 file
if only executed by others
chmod 001 file
if read/write by the owner and only read by everyone else
chmod (4+2)(4)(4) file
which is;
chmod 644 file
With this if all need executable rights
chmod (4+2+1)(4+1)(4+1) file
that's it;
chmod 755 file
This can also be calculated in a more professional way.
this can be interpreted as;
- rwx r-x r-- file--111 101 100
here;
r read w write x executable - nonWhere now when we convert each set binary digits to decimal,
|
|
We get the numeric values we wonted. In this case its 754
So we have to use the command.
chmod 754 file
Wednesday, May 12, 2010
Sri Lanka among the First 10 in Google Summer of Code 2010
Though Sri Lanka is geographically a small country in the world, its not that small when it comes to the IT world. The Google Summer of Code 2010 has proved what an important role Sri Lanka is playing in the Open Source world.
As a student of University of Moratuwa, Sri Lanka, I feel proud that there are 34 students accepted from Sri Lanka among the total 1,026 accepted students and most importantly its a glory that Sri Lanka has secured the 10th place among the 69 countries which are taking part in Gsoc 2010.
According to the statistics in the Google open source blog, it says ;
Our top ten countries by number of students accepted this year are: United States (197), India (125), Germany (57), Brazil (50), Poland (46), Canada (40), China (39), United Kingdom (36), France (35), Sri Lanka(34).

Source: Open Source at Google
Its a great pleasure to say that University of Moratuwa, Sri Lanka has produced 27 among the 34 Sri Lankan students who were selected,
They are;
12 from level 3, Department of Computer Science Engineering
Kasun Gajasinghe
Umashanthi Pavalanathan
Nirmal Fernando
Sanjaya Liyanage
Thilanka Kaushalya
Sriskandarajah Suhothayan
Ishan Jayawardene
Shelan Perera
Kasun Lakpriya
Eshan Sudharaka
Meharuban
Keheliya Gallaba
10 from level 4, Department of Computer Science Engineering
Kathiravelu Pradeeban
Harini Sirisena
Charith Dhanshuka
Harshana Eranga Martin
Udayanga Wickramasnghe
Chamith Buddhika
Kapila Bogahapitiya
Buddhi Prabath
Maleesh Prasan
Rajeev Sampath
1 from Department of Electronic & Telecommunication Engineering
Akila wajirasena
4 from Faculty of Information Technology
Lakshan Perera
Dilantha
Firzhan Naqash
Nuwan Sameera
If you are a past, present, a potential future student or mentor, or an enthusiast of the Google Summer of Code from Sri Lanka. Join Google Summer of Code - Sri Lankan Community at http://groups.google.com/group/gsoc-srilanka.
Thanks, Umashanthi for the resources.
Saturday, May 8, 2010
Installing Ubuntu parallel to your existing Windows
With the introduction of Ubuntu 10.04 LTS
I'm sure all of you are eager to install Ubuntu.
Its true, many of us have problems in doing this!
During this process we loose our data and sometimes our windows itself.
In certain cases this happen when we are updating Ubuntu :(
Because of this, Ubuntu installation has always been a scary thing!!
He is some simple steps how to solve this problem.
DISCLAIMER: Please use the information at your own risk. I do not take responsibility of whatever damages you do to your Ubuntu installation, data or anything else by using the information in this tutorial.
Step 1;
Back up your data(for safety)
Step 2;
Creating a separate partition for Ubuntu.
Windows comes with two built in features, shrink and extend.
sudo cp /boot/grub/menu.lst /boot/grub/menu.lst_bak
and enter your root password when asked - this makes a backup of the GRUB menu file just in case things go wrong.
Next, type in:
sudo gedit /boot/grub/menu.lst

Dualboot - Configure Boot Menu
This opens up the boot menu as a text file in gedit.

Dualboot - Boot Options
There are loads of options you can change, but only a couple that you’re likely to be interested in.
The default boot entry is defined by the “default” value. The default value is 0, which means that the first entry in the list (which is Ubuntu) always gets loaded.
You can also increase the boot menu timeout – just change the value for “timeout”. You can also hide the GRUB boot menu by removing the hash in front of “hiddenmenu”. Save and exit gedit to keep any changes.
If instead of GRUB you want Vista's bootloader to be in charge, load up the Vista installation and install EasyBCD. Go to “Manage Bootloader”, then “Reinstall the Vista Bootloader”, an GRUB is overwritten. You can then configure the Vista bootloader to add Linux to the boot menu.
Thanks.
I'm sure all of you are eager to install Ubuntu.
Its true, many of us have problems in doing this!
During this process we loose our data and sometimes our windows itself.
In certain cases this happen when we are updating Ubuntu :(
Because of this, Ubuntu installation has always been a scary thing!!
He is some simple steps how to solve this problem.
DISCLAIMER: Please use the information at your own risk. I do not take responsibility of whatever damages you do to your Ubuntu installation, data or anything else by using the information in this tutorial.
Step 1;
Back up your data(for safety)
Step 2;
Creating a separate partition for Ubuntu.
Windows comes with two built in features, shrink and extend.
- Click on "Start" button
- Go to "Control Panel"
- Select "System and Security"

- Select "Administrative Tools"

- Click on "Computer Management"

- Select the "Disk Management" option which is in "Storage".

- Now right click on the partition you want to Stink,
by this you can reduce the size of that partition and allocate some space to create new partition.
To do this Right click on the partition you want to Shrink,
You will get a drop down,
click "Shrink Volume"

it will take some time
This will ensure that no data is lost and when striking the Partition size. Now you will get a pop-up stating the the allowable Disk space.

- Enter the amount of disk space you prefer for that partition
(15 GB or more is recommended ) and click "Shrink"
now you will be able to find a new field appearing


- Now you insert the Ubuntu CD
- Restart the computer
- Set the boot-up setting to boot from the "Optical Drive"
Then the Ubuntu CD will get booted

- Click "Install Ubuntu"
You will be asked for conformation

Click "Forward"
- Select your language

Click "Forward"
- Select your time zone

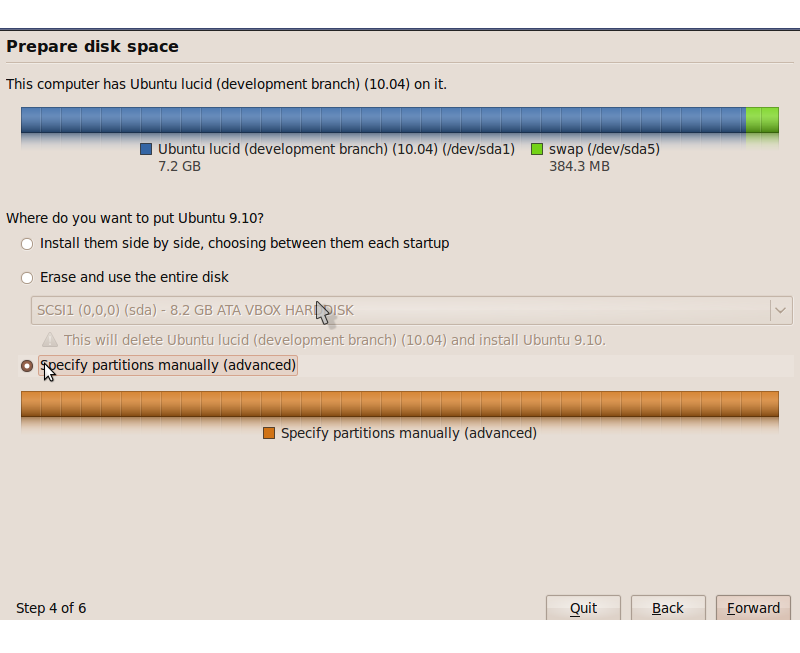
- Now most importantly Select "Specify partition manually" radio box.
Now you will get the partition table
(the entries in the table will look different according to your computer)
you will had unallocated space you will get a "free space" field.

- You can click on the free space field and add new partitions. If you dont have any free spcace select the partition you created to install Ubuntu (You will be able fo find that out by it's size) and then by clicking the "Change..." button you can go to "Edit partition".
Now you can make new portions within this selected partition.
This can be done by entering the "New portion size" value in the "Edit partition" dialogue box. You will be also able to further divide the free space created by this into small partitions.
create 3 partitions
- create a "swap" partition
this should be twice the size of the RAM memory in your computer.
for this select "use as" as "swap"
check the check box "format partition"
- Create a "root" partition:
it should be greater than 4GB (recommended) (4GB to 8GB)
for this select "use as" as "Ext4 journalling file system"
check the check box "format partition"
set mount point as "/"
- Create a "home" partition: (optional)
it could be the rest of the space left.
for this select "use as" as "Ext4 journalling file system"
check the check box "format partition"
set mount point as "/home"
- Change the mount point of the windows partition
Edit the windows partition
for this select "use as" as the one you had e.g. "ntfs"
and only change the mount point as "/windows"
Note : Do not check the "formate" check box
- create a "swap" partition
- Now click "forward" button

- Enter name, password, etc. and click "forward".
It will ask to import data form your existing windows operating system.
Check on the ones you wonted to import. If you don't wont to import any files you just leave it as it is.
Then click "Froward"
- you will get the info of what you going to do.
Click on "Advanced" button

Now you will get a dialogue box to install boot loader

- Select /dev/sda. This will install the Ubuntu boot loader.
In any case if you are installing this in your external hard drive please select the appropriate dev for that.
- Now click install.
The Ubuntu will get installed...!

- Finally you have to restart the system.
And thats it, all done!
Now you can login to both windows and Ubuntu.


Configuring GRUB Sources: apcmag.com
- This is not needed but if you didn't get your windows back or if you want to change the login order you can use this.
sudo cp /boot/grub/menu.lst /boot/grub/menu.lst_bak
and enter your root password when asked - this makes a backup of the GRUB menu file just in case things go wrong.
Next, type in:
sudo gedit /boot/grub/menu.lst
Dualboot - Configure Boot Menu
This opens up the boot menu as a text file in gedit.
Dualboot - Boot Options
The default boot entry is defined by the “default” value. The default value is 0, which means that the first entry in the list (which is Ubuntu) always gets loaded.
If you want to make it so that Windows Vista loads by default, change the value to 4, as Vista is the fifth item in the list (the numbering system starts at 0 and "Other operating systems" counts as a line).
The other way to load Windows Vista by default is to change the value for “default” from a numerical value to “saved”. Then, GRUB will load whichever boot entry has been marked with “savedefault”.
The other way to load Windows Vista by default is to change the value for “default” from a numerical value to “saved”. Then, GRUB will load whichever boot entry has been marked with “savedefault”.
If you scroll down the list and have a look at the entries, you’ll notice that both the main Ubuntu entry and Windows Vista have been marked with “savedefault”. Remove the value for Ubuntu and Windows Vista will launch by default.
It's also worthwhile changing the description of the Vista entry from "Windows Vista/Longhorn (loader" to just "Windows Vista".
You can also increase the boot menu timeout – just change the value for “timeout”. You can also hide the GRUB boot menu by removing the hash in front of “hiddenmenu”. Save and exit gedit to keep any changes.
If instead of GRUB you want Vista's bootloader to be in charge, load up the Vista installation and install EasyBCD. Go to “Manage Bootloader”, then “Reinstall the Vista Bootloader”, an GRUB is overwritten. You can then configure the Vista bootloader to add Linux to the boot menu.
Thanks.
Refrence;
How to Install Ubuntu Linux (Setup & Installation Guide)Ubuntu installation guide
Ubuntu 8.04.3 USB Hard Drive Install
[HOWTO] Downgrading from Ubuntu 10.04 Lucid Lynx to 9.10 Karmic Koala
New Windows 7 - Future Operating System- Windows Vienna - Windows blackcomb - Windows 2010
Dual Booting Vista and Linux
Ubuntu download
Subscribe to:
Posts (Atom)