Showing posts with label Ubuntu. Show all posts

Monday, November 7, 2016

Setting up Hadoop to run on Single Node in Ubuntu 15.04

This is tested on hadoop-2.7.3.

Improvement on Hadoop documentation : http://hadoop.apache.org/docs/r2.7.2/hadoop-project-dist/hadoop-common/SingleCluster.html

Step 1 

Make sure Java is installed

Installation instruction : http://suhothayan.blogspot.com/2010/02/how-to-set-javahome-in-ubuntu.html

Step 2

Install pre-requisites

$ sudo apt-get install ssh
$ sudo apt-get install rsync

Step 3

Setup Hadoop

$ gedit hadoop-2.7.3/etc/hadoop/core-site.xml

Add (replace {user-name} with system username, E.g "foo" for /home/foo/)

<configuration>
    <property>
        <name>fs.defaultFS</name>
        <value>hdfs://localhost:9000</value>
    </property>
    <property>
<name>hadoop.proxyuser.{user-name}.groups</name>
        <value>*</value>
    </property>
    <property>
        <name>hadoop.proxyuser.{user-name}.hosts</name>
        <value>*</value>
    </property>
</configuration>

$ gedit hadoop-2.7.3/etc/hadoop/hdfs-site.xml 

Add 

<configuration>
    <property>
        <name>dfs.replication</name>
        <value>1</value>
    </property>
</configuration>

Step 4

Run

$ ssh localhost 

If it requested for password, run:

$ ssh-keygen -t dsa -P '' -f ~/.ssh/id_dsa
$ cat ~/.ssh/id_dsa.pub >> ~/.ssh/authorized_keys
$ chmod 0600 ~/.ssh/authorized_keys

Try ssh localhost again.
If it still asks for password, run following and try again:

$ ssh-keygen -t rsa
#Press enter for each line
$ cat ~/.ssh/id_rsa.pub >> ~/.ssh/authorized_keys
$ chmod og-wx ~/.ssh/authorized_keys 

Step 5

Clean namenode

$ ./hadoop-2.7.3/bin/hdfs namenode -format

Step 6 * Not provided in Hadoop Documentation 

Replace ${JAVA_HOME} with hardcoded path in hadoop-env.sh

gedit hadoop-2.7.3/etc/hadoop/hadoop-env.sh

Edit the file as 

# The java implementation to use.
export JAVA_HOME={path}/jdk1.8.0_111

Step 7

Start Hadoop 

$ ./hadoop-2.7.3/sbin/start-all.sh

The Hadoop daemon log output is written to the $HADOOP_LOG_DIR directory (defaults to $HADOOP_HOME/logs).

Browse the web interface for the NameNode;

http://localhost:50070/

Step 8

Check processors running by running:

$ jps

Output: 

xxxxx NameNode
xxxxx ResourceManager
xxxxx DataNode
xxxxx NodeManager
xxxxx SecondaryNameNode

Step 9

Make HDFS directories for MapReduce jobs:

$ ./hadoop-2.7.3/bin/hdfs dfs -mkdir /user
$ ./hadoop-2.7.3/bin/hdfs dfs -mkdir /user/{user-name}


Tuesday, May 8, 2012

Setting brightness at Ubuntu startup


In Ubuthu machines such as Thinkpad T520 every-time when we restart the computer the brightness level will be at its maximum and then we need to manually set the brightness to a comfortable level.

To solve this issue here I share a small script I have written.

First install xdotool
sudo apt-get install xdotool
This will allow you to change the brightness easily from the command line with out admin privileges.


Check whether the brightness is changing with the following command
xdotool key XF86MonBrightnessDown

Now we have to find the file where the brightness value is stored, try doing
cat /sys/class/backlight/acpi_video0/brightness
If you get an integer value then your good to proceed, else you have to find the appropriate file in your system. In that case check in /sys/class/


Adjust the brightness and find your desired brightness level using the above command E.g. 9


In this example I have used 9 as my brightness level change it according to you.

 
#!/bin/bash

myBrightness=9;
currentBrightness=`cat /sys/class/backlight/acpi_video0/brightness`;
count=$(( $currentBrightness - $myBrightness )) ;
while [ $count -gt 0 ]
do
     xdotool key XF86MonBrightnessDown
     let  count=$(($count-1));
done
Save this as brightness.sh


Then make this file to be an executable, by running
chmod +x brightness.sh

Finally open the "Startup Applications" click Add and add the following


Name :<appropriate name>
Command:/<path to file from root>/brightness.sh
Comment:<appropriate comment>

Sunday, April 29, 2012

Change the default Java installation used by Ubuntu


Though you have installed and using a particular Java installation (E.g. Oracle Java 7), sometimes when you install some other softwares they might change the default to other Java installations (E.g. OpenJDK)

In such situations to change the default version, run the following commands and chose the appropriate selection when prompted.

For Java :
update-alternatives --config java
For Java compiler :
update-alternatives --config javac
For Java web start :
update-alternatives --config javaws

How to instal Java in Ubuntu

Now, Java is installed and we need to set the JAVA_HOME.
Visit How to set JAVA_HOME in Ubuntu post to get to know how you can appropriately set JAVA_HOME and PATH.

Wednesday, November 30, 2011

Lets forget your ubuntu passwords switch to fingerprint reder

Guys I found an interesting  post on fprint that helps all with your logins in Ubuntu.
Just follow the post in;

https://launchpad.net/~fingerprint/+archive/fprint

or in a nutshell
run lsusb in your Terminal and check whether your fingerprint reader has one these
     045e:00bb        05ba:0007        08ff:2580
     045e:00bc        05ba:0008        08ff:5501
     045e:00bd        05ba:000a        1162:0300
     045e:00ca        061a:0110        138a:0001
     0483:2015        08ff:1600        147e:1000
     0483:2016        08ff:2500        147e:2016

If sodo the following

1. Add this PPA to your sources:
      sudo add-apt-repository ppa:fingerprint/fprint
      sudo apt-get update
      sudo apt-get upgrade
2. Install the software:
     sudo apt-get install libfprint0 fprint-demo libpam-fprintd gksu-polkit

Then go to the "User Accounts" and enable fingerprint reader for your account.

All the best ..!

The most interesting thing is, for every sudo you can now sweap your finger.. and no need to type the passwords any more. :-)

for your reference here is a you-tube video
http://www.youtube.com/watch?v=YtcXPXYTR-E

Thursday, October 28, 2010

Shortcut launcher for IntelJ Idea in Ubuntu

Than starting from command prompt, Launcher is a fascinating way to start programs by a single click in Ubuntu.


We can add launchers either in the Desktop or on panels.
To add one, right click the panel and select "Add to panel...", you will get the "Add to panel" window.
Here double click on "custom application launcher".


On the "Create launcher" window, for name type "Idea" and for the  command type:
/bin/sh -c 'export JDK_HOME=path for Java home && path for /bin/idea.sh
E.g.
/bin/sh -c 'export JDK_HOME=/usr/lib/jvm/java-6-sun-1.6.0.20 && /home/suho/proj/idea-IU-95.66/bin/idea.sh'

By clicking the launcher icon on the "Create launcher" window you can select an image file to add as the icon of your launcher. For Idea you can find its image form Idea_Home/bin/

Happy coding!

Huawei E1550 USB 3G Modem on Ubuntu

USB modem configuration is always an issue for Ubuntu users. Here I provide an easy solution which worked for my Huawei E1550 USB modem on my Ubuntu 10.04 Lucid Lynx.

Ubuntu has a great feature called rule files, here we only need to create a new configuration file for our USB modem. After creating the corresponding rule file the machine will automatically switch the USB mode of your 3G Modem from USB Storage to USB Modem.

As the first step we need to find out the product id and the vendor id of our 3G USB modem. Connect the Modem, then in the terminal type;
$ lsusb
You will get a list of drivers connected to the USB ports.
In my case, one of the entries I found was.
Bus 002 Device 004: ID 12d1:1446 Huawei Technologies
Here 1446 is the Product id, and 12d1 is the vendor id, of my USB Modem.
Note: In this case, my system has only recognized the USB Modem a USB Storage drive.

Now you need to create a rule file for the Modem.

$ sudo vi /etc/udev/rules.d/15-huawei-155x.rules

Then type the following:

ACTION!="add", GOTO="huawei_zerocd_end"

SUBSYSTEM=="usb", ATTR{bDeviceClass}!="ff" ,ENV{DEVTYPE}=="usb_device", GOTO="huawei_zerocd_disable"
SUBSYSTEM=="scsi", ENV{DEVTYPE}=="scsi_device", GOTO="huawei_zerocd_disable"
GOTO="huawei_zerocd_end"

LABEL="huawei_zerocd_disable"
ATTRS{idVendor}=="12d1", ATTRS{idProduct}=="1446", RUN+="modem-modeswitch -v 0x%s{idVendor} -p 0x%s{idProduct} -t option-zerocd"

LABEL="huawei_zerocd_end"

Now, save and exit. Next time when you plug in your USB modem, your system should automatically switch it to USB Modem mode and you’re good to go.

To cross check whether Ubuntu has properly detected the USB modem, type;
$ lsusb
now your output should contain a line like;
Bus 002 Device 004: ID 12d1:1001 Huawei Technologies Co., Ltd. E620 USB Modem
Now if you get something like this, then you can be sure that the system has successfully recognized your USB as 3G Modem.
Note there is an “USB Modem ” at the end of the line.

But before you can finally start using your USB modem to connect to the Internet, you still need to configure your network connections. Simply go to “System -> Preferences -> Network Connections” and select the “Mobile Broadband” tab. Then click the “Add” button and the Mobile Broadband Connection wizard should be able to help you configure your Internet connection in no time.

For other USB Modems try the same technique by adding the corresponding product and vendor ids. Wish they will work for you :-)

Tuesday, October 5, 2010

The 'vi' arrow keys not working in Ubuntu

Most people get this issue of arrow keys not working for 'vi' in Ubuntu. Instead, it displays A, B, C, and D characters.

This is because the default 'vi' in Ubuntu is a vi 'light' version (that is the vim-tiny package). This does not use the arrow keys as you would expect.

If you want the arrow keys to function you have to install the 'full' vim package. By this you not only get the arrow keys working but also other nice features such as colored syntax.

Just installing the 'vim' package should get you fixed up. Try:

sudo apt-get install vim
or
sudo apt-get install vim-full

'vim-full' will install all the vim related package and the dependencies, that includes gnome libs, etc... if you don't use gnome and just want to fix this issue in the text mode you can also run :

sudo apt-get install vim-runtime

Thursday, August 19, 2010

Forgot your password...! This is how you reset in Ubuntu.

It's a common case that when you have not used your Ubuntu machine for some time you may have forgotten your password.
If you want to reset a new password instead of your old one,
and don't want to loose any of your date this is the coolest way to do.

But for this your computer need to have a CD ROM and you need to have a Ubuntu Live CD with same(preferred) or fairly close version.

Step 1.
Insert the Live CD and boot the computer in the Live CD mode.

Step 2.
Open the terminal and change to the root user

sudo su

Step 3.
create a directory
e.g.
mkdir foo

Step 4.
Find your Linux partition.
e.g. using the command
fdisk -l

by this you will get all the partition in the computer, and by looking at them you can find out your Linux partition.
e.g.
Device    Boot      Start         End      Blocks   Id  System
/dev/sda1   *           1       18710   150288043+  83  Linux
/dev/sda2           18711       19457     6000277+   5  Extended
/dev/sda5           18711       19457     6000246   82  Linux swap / Solaris

here the Linux partition is /dev/sda1

Step 5.
mount the partition the the newly created file.
e.g.
mount /dev/sda1 foo/


Step 6.
Use chroot to access the partition as its root
e.g.
chroot foo/

now you have all the root permission to the mounted hard-disk partition.

Step 7.
Use the file etc/shadow to find out the users of the system
e.g. if the user name is bar,
use the commands
passwd bar

to change user password
and
passwd root

to change the root password

that's it! all done.
Now restart the computer and login to the system with the new password.

Tuesday, June 1, 2010

Shell scrips to start and stop background processes in Linux

Here I presents an overview of some useful shell scripts for starting and stopping background process, manually, or by other shells or programmes.

To start and stop background processes, in most situations we need their PID (process ID).

To find out the PID of the process
use the command;
ps 

To show all the processes;
ps -A 

To find out the  PID and the PGID (process group ID) of the processes;
ps -o cmd,pid,pgid

To get the PID for the given process name;
pgrep <process name>
e.g 
pgrep bash
 
To
kill the process

To kill the process by process name;
pkill <process name>
e.g. 
pkill java

To kill by PID;
kill -9 <PID>
e.g.
kill -9 12345

To kill by
PGID (process group ID);
kill -9 -<PGID>
e.g. if pgid is 9876, then type as;
kill -9 -9876

To kill process by their process name;
pkill <process name>
e.g.
pkill java

Now we'll move in to background processes. These
processes seems to useful situations like;
  • Other processes want the same terminal to execute them selves.
  • When time consuming processes is executed
  • Several processes need to be started one after other
  • etc

There is a very easy way
to do this in Linux. We just need to add '2>&1 &' at the end of the shell command, where the process will start in the background and immediately returns the terminal back to the user.

e.g. 
./server.sh 2>&1 &
./server.sh > server.log 2>&1 &

Note: If you use '2>&1', the script won't return the terminal, until the processing is over.

But when we start and kill processes pragmatically, we encounter a new challenge. We should kill the exact process that we started, and we
should not kill some other process!!
To do so, we should keep tack of the PID of the processes we started.

In order to get the PIDs, we can add the following code to the shell script that we are running.
To get the PID of the process that is currently running;
echo $$ > server.pid

Or to get the PID of the process,
last started;
echo $! &> server.pid

Well, now we have the PID. Next, we have to kill the processes we stated.
If we only have single processes - which don't have child processes
- we can use a command like;
cat server.pid | xargs -i kill -9 {}

This kills all the processes, who's PIDs in the servers.pid.

But
sometimes we encounter process trees, in this case when we kill the parent process the child process wont just get killed, but it itself will become a parent. In such situations we should kill the whole process tree.

If you want to view the process tree, you can use the command;
ps f

Or for a detailed view;
pstree

Sometimes in background processes, you encounter problems that the child processes wont get killed even we kill the parent process. Therefore to kill the child processes, you can use two approaches.
  1. kill the process tree (recommended)
  2. kill the processes which contains the same PGID (this works because in most cases the whole process tree will have the same process group id (PGID))

Killing the process tree using the parent's PID

you can uses that following shell script;
#!/bin/sh
for i in `ps -ef| awk '$3 == '${$1}' { print $2 }'`
do
echo killing $i
kill -9 $i
done
echo killing $1
kill -9 $1

Save this as 'kill-process-tree.sh'

Give executable permission to the script by the command;
chmod 755 kill-process-tree.sh

Then use the command to run the script;
./kill-process-tree.sh
e.g.
./kill-process-tree.sh 7234

Killing the processes which contains the same PGID

First we need to find out the PGID of the given PID of the process;
echo $! |xargs echo | xargs -i ps -o pgid -p {}|xargs echo |awk '{print $2}' > server.pgid

Then to kill the processes with give PGID use the command;
cat server.pid | xargs -i kill -9 -{}

Sunday, May 16, 2010

Linux/Unix chmod (chmod xxx file)

Here I'm giving a brief explanation on how to changes the permission of a file in Linux/Unix system.

Syntax;
chmod [numeric number] [file]

here [numeric number] is created using the following criteria.


owner
(User who owns the file.)
group
(Group that owns the file.)
anybody
(Other)
non 0 0 0
read 4 4 4
write 2 2 2
execute 1 1 1

so its easy.
if you want only read by owner;
chmod 400 file

if only executed by others
chmod 001 file

if read/write by the owner and only read by everyone else
chmod (4+2)(4)(4)  file
which is;
chmod 644 file

With this if all need executable rights
chmod (4+2+1)(4+1)(4+1)  file
that's it;
chmod 755 file

This can also be calculated in a more professional way.

when we are checking the permissions of files using "ls -l" command in the terminal we get a results which looks like "- rwx r-x r-- file ".
this can be interpreted as;
- rwx r-x r-- file 
--111 101 100
here;
    r  read
    w  write
    x executable
    - non
 
Where now when we convert each set binary digits to decimal,
BinaryDecimal
0000
0011
0102
0113
BinaryDecimal
1004
1015
1106
1117

We get the numeric values we wonted. In this case its 754
So we have to use the command.
chmod 754 file

Saturday, May 8, 2010

Installing Ubuntu parallel to your existing Windows

With the introduction of Ubuntu 10.04 LTS
I'm sure all of you are eager to install Ubuntu.

Its true, many of us have problems in doing this!
During this process we loose our data and sometimes our windows itself.
In certain cases this happen when we are updating Ubuntu :(

Because of this, Ubuntu installation has always been a scary thing!!

He is some simple steps how to solve this problem.

DISCLAIMER: Please use the information at your own risk. I do not take responsibility of whatever damages you do to your Ubuntu installation, data or anything else by using the information in this tutorial.

Step 1;
Back up your data(for safety)

Step 2;
Creating a separate partition for Ubuntu.

Windows comes with two built in features, shrink and extend.
  1. Click on "Start" button
  2. Go to "Control Panel"
  3. Select "System and Security"


  4. Select "Administrative Tools"


  5. Click on "Computer Management"


  6. Select the "Disk Management" option which is in "Storage".


  7. Now right click on the partition you want to Stink,
    by this you can reduce the size of that partition and allocate some space to create new partition.

    To do this Right click on the partition you want to Shrink,
    You will get a drop down,
    click "Shrink Volume"


    it will take some time


            This will ensure that no data is lost and when striking the Partition size.         Now you will get a pop-up stating the the allowable Disk space.


  8. Enter the amount of disk space you prefer for that partition
    (15 GB or more is recommended ) and click "Shrink"
  9. now you will be able to find a new field appearing
    by right clicking this Unallocated space you can now create a partition. (this is not a must you can leave it as Unallocated for this purpose). This is the new space where we are going to install Ubuntu!!
  Step 3; Installing Ubuntu
  1. Now you insert the Ubuntu CD
  2. Restart the computer
  3. Set the boot-up setting to boot from the "Optical Drive"

    Then the Ubuntu CD will get booted


  4. Click "Install Ubuntu"

    You will be asked for conformation


    Click "Forward"

  5. Select your language


    Click "Forward"

  6. Select your time zone


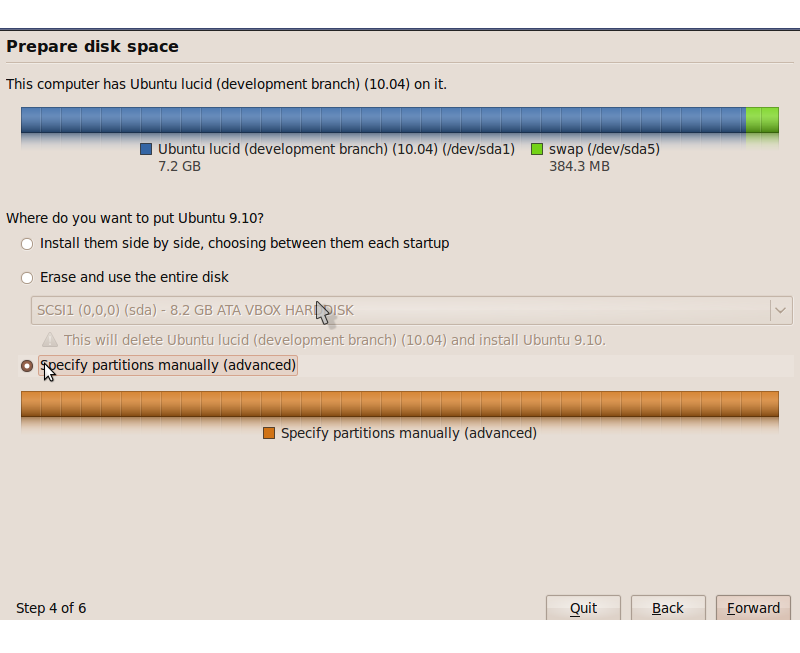
  7. Now most importantly Select "Specify partition manually" radio box.


    Now you will get the partition table
    (the entries in the table will look different according to your computer)

    you will had unallocated space you will get a "free space" field.


  8. You can click on the free space field and add new partitions. If you dont have any free spcace select the partition you created to install Ubuntu  (You will be able fo find that out by it's size) and then by clicking the "Change..." button you can go to "Edit partition".


    Now you can make new portions within this selected partition.
    This can be done by entering the "New portion size" value in the "Edit partition" dialogue box. You will be also able to further divide the free space created by this into small partitions.

    create 3 partitions 


    1. create a "swap" partition
      this should be twice the size  of the RAM memory in your computer.
      for this select "use as" as "swap"
      check the check box "format partition"
    2. Create a "root" partition:
      it should be greater than 4GB (recommended) (4GB to 8GB)
      for this select "use as" as "Ext4 journalling file system"
      check the check box "format partition"
      set mount point as "/"
    3. Create a "home" partition: (optional)
      it could be the rest of the space left.
      for this select "use as" as "Ext4 journalling file system"
      check the check box "format partition"
      set mount point as "/home"
    4. Change the mount point of the windows partition
      Edit the windows partition
      for this select "use as" as the one you had e.g. "ntfs"
      and only change the mount point as "/windows"
      Note : Do not check the "formate" check box

  9. Now click "forward" button


  10. Enter name, password, etc. and click "forward".

    It will ask to import data form your existing windows operating system.
    Check on the ones you wonted to import. If you don't wont to import any files you just leave it as it is.


    Then click "Froward"

  11. you will get the info of what you going to do.

    Click on "Advanced" button


    Now you will get a dialogue box to install boot loader


  12. Select  /dev/sda.  This will install the Ubuntu boot loader.

    In any case if you are installing this in your external hard drive please select the appropriate dev for that.

  13. Now click install.

    The Ubuntu will get installed...!


  14. Finally you have to restart the system.
    And thats it, all done!
  15. Now you can login to both windows and Ubuntu.

Configuring GRUB Sources: apcmag.com

    This is not needed but if you didn't get your windows back or if you want to change the login order you can use this.
If you want to modify how GRUB handles the new dualbooting environment, you need to edit the boot menu. Boot into Ubuntu and open up a Terminal window (Applications, Accessories, Terminal), and type in:

sudo cp /boot/grub/menu.lst /boot/grub/menu.lst_bak

and enter your root password when asked - this makes a backup of the GRUB menu file just in case things go wrong.

Next, type in:
sudo gedit /boot/grub/menu.lst


Dualboot - Configure Boot Menu 


Dualboot - Configure Boot Menu

This opens up the boot menu as a text file in gedit.


Dualboot - Boot Options 

Dualboot - Boot Options
There are loads of options you can change, but only a couple that you’re likely to be interested in.

The default boot entry is defined by the “default” value. The default value is 0, which means that the first entry in the list (which is Ubuntu) always gets loaded.
 
If you want to make it so that Windows Vista loads by default, change the value to 4, as Vista is the fifth item in the list (the numbering system starts at 0 and "Other operating systems" counts as a line).

The other way to load Windows Vista by default is to change the value for “default” from a numerical value to “saved”. Then, GRUB will load whichever boot entry has been marked with “savedefault”.
 
If you scroll down the list and have a look at the entries, you’ll notice that both the main Ubuntu entry and Windows Vista have been marked with “savedefault”. Remove the value for Ubuntu and Windows Vista will launch by default. 
It's also worthwhile changing the description of the Vista entry from "Windows Vista/Longhorn (loader" to just "Windows Vista". 

You can also increase the boot menu timeout – just change the value for “timeout”. You can also hide the GRUB boot menu by removing the hash in front of “hiddenmenu”. Save and exit gedit to keep any changes.

If instead of GRUB you want Vista's bootloader to be in charge, load up the Vista installation and install EasyBCD.
Go to “Manage Bootloader”, then “Reinstall the Vista Bootloader”, an GRUB is overwritten. You can then configure the Vista bootloader to add Linux to the boot menu.  

Thanks.

Monday, March 8, 2010

Mounting .disk files on Ubuntu

Sometimes we may be very unfortunate and we may not be in a situation to boot our Ubuntu. In such situations our only choice is to go for the file recovery.

This can be done easily in Ubuntu.

First use the Ubuntu live CD and boot your system.
Then locate the root.disk file. which is your Ubuntu's root directory.

If you have installed Ubuntu inside Windows
you may find this in C:\ubuntu\root.disk

in such situation you need to first mount your filesystem partition. This can be done by

Code:
sudo mkdir /win
sudo mount /dev/sda1 /win


always, replace "sda1" with the appropriate configuration, i.e. "sda2" or "sda3"...
(just remember: a=disk, 1=partition number)
and now you can find your partition in /win Directory.

Now you can mount your root.disk and this can be done by:
Code:
sudo mkdir /vdisk
sudo -o loop /win/ubuntu/disks/root.disk /vdisk


now your files in root.disk can be accessed through /vdisk

Wednesday, February 24, 2010

How to set JAVA_HOME in Ubuntu

Tuesday, February 23, 2010

Root loging via GUI in Ubuntu

I'm writing this post since I have a problem of remembering this every time when I wanted to use it. I think this would also help you.

To get the root through GUI

1) You have to press

alt + F2

it will open dialog box called 'Run Application'

2) then you type
'gksudo nautilus' without quots

in the text field and then Ubuntu will ask for your Password.

3) type the password

then you will get the window with '/root'
where you have all admin rights

Note:

In this mode there won't be any warning when deleting or modifying files which will get you in to trouble even if you accidentally deleted or modified admin files. Therefore be careful and do not use this mode unless otherwise it's really needed.