Friday, July 25, 2014

Without restart: Enabling WSO2 ESB as a JMS Consumer of WSO2 MB

WSO2 ESB 4.8.1 & WSO2 MB 2.2.0 documentations have information on how to configure WSO2 ESB as a JMS Consumer of WSO2 MB queues and topics. But they do not point out a way to do this without restarting ESB server.

In this blog post we'll solve this issue.

With this method we will be able to create new queues in WSO2 MB and consume them from WSO2 ESB without restarting it.

Configure the WSO2 Message Broker

  • Offset the port of WSO2 MB to '1'  
  • Copy andes-client-*.jar and geronimo-jms_1.1_spec-*.jar from $MB_HOME/client-lib to $ESB_HOME/repository/components/lib 
  • Start the WSO2 MB

Configure the WSO2 Enterprise Service Bus

  • Edit the $ESB_HOME/repository/conf/jndi.properties file (comment or delete any existing configuration)
connectionfactory.QueueConnectionFactory = amqp://admin:admin@clientID/carbon?brokerlist='tcp://localhost:5673'
connectionfactory.TopicConnectionFactory = amqp://admin:admin@clientID/carbon?brokerlist='tcp://localhost:5673'
  • Edit the $ESB_HOME/repository/conf/axis2.xml file and uncomment the JMS Sender and JMS Listener configuration for WSO2 Message Broker 
  • Start the WSO2 ESB 

Create Proxy Service

The Proxy Service name will become the queue name in WSO2 MB. If you already have a queue in MB and if you want to listen to that queue, then set that queue name as the proxy service name. Here I'm using 'JMSConsumerProxy' as the queue name and the proxy service name.

<?xml version="1.0" encoding="UTF-8"?> 
<proxy xmlns="http://ws.apache.org/ns/synapse" 
       name="JMSConsumerProxy" 
       transports="jms" 
       statistics="disable" 
       trace="disable" 
       startOnLoad="true"> 
   <target> 
      <inSequence> 
         <property name="Action" 
                   value="urn:placeOrder" 
                   scope="default" 
                   type="STRING"/> 
         <log level="full"/> 
         <send> 
            <endpoint> 
               <address uri="http://localhost:9000/services/SimpleStockQuoteService"/> 
            </endpoint> 
         </send> 
      </inSequence> 
      <outSequence> 
         <drop/> 
      </outSequence> 
   </target> 
   <description/> 
</proxy> 

Testing the scenario

  • Inside $ESB_HOME/samples/axis2Server/src/SimpleStockQuoteService run ant 
  • Now start the Axis2 Server inside $ESB_HOME/samples/axis2Server (run the relevant command line script
  • Log into the WSO2 Message Broker Management Console and navigate to Browse Queues 
  • Find a Queue by the name JMSConsumerProxy 
  • Publish 1 message to the JMSConsumerProxy with payload (this has to be done in the Message Broker Management Console) 
<ser:placeOrder xmlns:ser="http://services.samples" xmlns:xsd="http://services.samples/xsd"> 
    <ser:order> 
        <xsd:quantity>4</xsd:quantity> 
    </ser:order> 
</ser:placeOrder>
  • Observe the output on the Axis2 Server and WSO2 ESB console.
Hope this helped you :) 

Friday, February 28, 2014

Getting inside out of Social Data using WSO2 BAM & WSO2 CEP

We engage in Social Media, but have we ever analysed the data it contains?

Why we need to analyse?
Can it help us to make prompt business decisions?
How we can do that?

I have done a screencast to answer all these,
using WSO2 Business Activity Monitor (2.4.0) and WSO2 Complex Event Processor (3.0.0).


Wednesday, April 10, 2013

Integrating WSO2 BAM & WSO2 CEP

This post demonstrate how we can integrate both WSO2 BAM and WSO2 CEP and run them as a single instance.

To integrate both WSO2 BAM and WSO2 CEP we need to download BAM and install the CEP features form the WSO2 p2repo. Here I have used WSO2 BAM 2.2.0 and 4.0.7 p2repo. Follow the wiki link to get to know how to install new features to existing products.

Testing the installation.
To test the instillation add broker-manager-config.xml to repository/conf/, and add axis2_client.xml to repository/conf/axis2/.
Here axis2_client.xml has the email sender information, and I'm using a demo email account for this.

Then create a directory called 'cepbuckets' in repository/deployment/server/ and add bam-cep-kpi-analyzer.xml there.
In bam-cep-kpi-analyzer.xml, you will be able to find a line
<cep:output brokerName="emailBroker" topic="wso2cep.demo@gmail.com/Phone Purchase Notification">
Change "wso2cep.demo@gmail.com" to the endpoint use email ID, who needs to receive the notification.

Now if you run the KIP-analyser sample of BAM all the events that have totalPrice>350000 and quantity>3 will be notified to the user.

Wednesday, March 13, 2013

Monitoring ActiveMQ Queues via JMX MBeans with WSO2 Complex Event Processor (WSO2 CEP)

WSO2 CEP and WSO2 Business Activity Monitor have support for JMX MBeans monitoring. You can find the docs for JMX MBeans monitoring for WSO2 BAM from here.

I'm writing this blog to illustrate how WSO2 CEP can be used to monitor the JMX MBeans, and I'm using ActiveMQ JMS broker as an example to demonstrate its capabilities.
Here I have used apache-activemq-5.4.3

First we need to enable ActiveMQ JMS broker to support JMX remotely.

To do so, you have to enable JMX in the broker, in the <activemq_home>/conf/activemq.xml:
<broker xmlns="http://activemq.org/config/1.0" brokerName="localhost" useJmx="true">
 and 
<managementContext>
    <managementContext connectorPort="1099" />
</managementContext> 
Now you have to enable JMX in the JVM parameters in <activemq_home>/bin/activemq: 
Locate the line 
ACTIVEMQ_OPTS="$ACTIVEMQ_OPTS $SUNJMX $SSL_OPTS" 
and change it to: 
ACTIVEMQ_OPTS="$ACTIVEMQ_OPTS $SUNJMX $SSL_OPTS -Dcom.sun.management.jmxremote -Dcom.sun.management.jmxremote.ssl=false -Dcom.sun.management.jmxremote.authenticate=false" 

To test whether its correctly working run "jconsole"

Now we need to Enable to CEP to receive JMX Events

To do so first we need to install JMX Agent to CEP 

Add 4.0.7 P2 repository form the URL  http://dist.wso2.org/p2/carbon/releases/4.0.7

Next install the "BAM JMX Agent Aggregate" 


Restart CEP.

Now we need to configure JMX.

To do so, go to Configure -> JMX Agent 
Click on "Add Profile"  and configure he profile as below


Here use the Data Receiver user name & password as "admin" & "admin" 
and JMX Server user name & password as "admin" & "activemq" 

Then  click on the "Load Means" button to load the available MBeans, 
Note : ActiveMQ need to be up an running in-order to load its MBeans

Next when you click on the appropriate MBean a dropdown will appear showing its attributes. 

You have to select your relevant attributes one by one from the drop down. 

You also need to change the Alias to a much readable strings, 
For this Example I have used:
BrokerName, TotalEnqueueCount, TotalDequeueCount, TotalMessageCount, MemoryPercentUsage

Now click "Save" to save & deploy the JMX Agent.

When we add the above configuration JMX agent will automatically create the following WSO2 Event Stream Definition

{
    "streamId": "org.wso2.bam.jmx.agent.activemq:1.0.0",
    "name": "org.wso2.bam.jmx.agent.activemq",
    "version": "1.0.0",
    "nickName": "JMX Dump",
    "description": "JMX monitoring data",
    "metaData": [{
        "name": "clientType",
        "type": "STRING"
    }, {
        "name": "host",
        "type": "STRING"
    }],
    "payloadData": [{
        "name": "BrokerName",
        "type": "STRING"
    }, {
        "name": "TotalEnqueueCount",
        "type": "LONG"
    }, {
        "name": "TotalDequeueCount",
        "type": "LONG"
    }, {
        "name": "TotalMessageCount",
        "type": "LONG"
    }, {
        "name": "MemoryPercentUsage",
        "type": "INT"
    }]
}

Next step is creating a CEP Bucket to use JMX event. 
To do this:
  • Shutdown CEP 
  • Run "ant deploy-broker-manager" from  <cep_home>/samples/cep-samples
  • Copy paste activemq-all-xxx.jar from the <activemq_home> directory to <cep_home>/samples/lib directory. 
  • Copy paste activemq-core-xxx.jar and geronimo-j2ee-management_1.1_spec-1.0.1.jar from <activemq_home>/lib to <cep_home>/repository/components/lib directory.
  • Copy the queue-monitor.xml to <cep_home>/repository/deployment/server/cepbuckets
  • In a new terminal run "ant jmsSubscriber -Dtopic=QueueInfo" from <cep_home>/samples/cep-samples to receive the outputs of the queue-monitor bucket.
  • Start CEP 
Now try running the Queue example which is in the <amq_home>/example.
In a new terminal run "ant consumer" to run the sample consumer 
In a new terminal run "ant producer" to send some sample messages to the ActiveMQ Queue. 

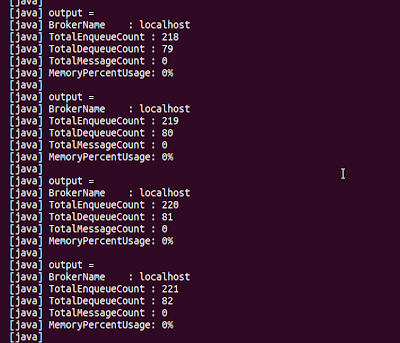
you will be able to view some appropriate outputs in CEP QueueInfo jmsSubscriber

Monday, February 25, 2013

No connector available to access repository - FIXED! - Maven Wagon

When you try to deploy artifacts to Sonatype using maven 3, If you encounter the following error, you probably have not configured Maven Wagon properly  

[INFO] ------------------------------------------------------------------------
[INFO] BUILD FAILURE
[INFO] ------------------------------------------------------------------------
[INFO] Total time: 24.444s
[INFO] Finished at: Tue Feb 26 06:37:48 IST 2013
[INFO] Final Memory: 10M/981M
[INFO] ------------------------------------------------------------------------
[ERROR] Failed to execute goal org.apache.maven.plugins:maven-deploy-plugin:2.7
:deploy (default-deploy) on project test-core: Failed to deploy artifacts/metad
ata: No connector available to access repository xxx-maven2-repository (scp://x
xxx/maven2/) of type default using the available factories WagonRepositoryConne
ctorFactory -> [Help 1]
[ERROR]
[ERROR] To see the full stack trace of the errors, re-run Maven with the -e swi
tch.
[ERROR] Re-run Maven using the -X switch to enable full debug logging.
[ERROR]
[ERROR] For more information about the errors and possible solutions, please re
ad the following articles:
[ERROR] [Help 1] http://cwiki.apache.org/confluence/display/MAVEN/MojoExecution
Exception

To fix this issue 
  • Add wagon extensions to your pom.
    <build>
        <extensions>
            <extension>
                <groupId>org.apache.maven.wagon</groupId>
                <artifactId>wagon-ssh</artifactId>
                <version>2.4</version>
            </extension>
        </extensions>
    </build>
  • Add distribution management segment to your pom.
    <distributionManagement>
        <repository>
            <id>xxx-maven2-repository</id>
            <name>Xxx Maven2 Repository</name>
            <url>scp://xxxx/maven2/</url>
        </repository>
        <snapshotRepository>
            <id>xxx-maven2-snapshot-repository</id>
            <name>Xxx Maven2 Snapshot Repository</name>
            <url>scp://xxxx/snapshots/maven2/</url>
        </snapshotRepository>
    </distributionManagement>
Not it works !
For more info on using extensions refer: http://maven.apache.org/guides/mini/guide-using-extensions.html